среда, 9. мај 2012.

Roast pork loin with bacon and brown sugar glaze


Roast Pork Loin with Bacon and Brown Sugar Glaze
Serves 3


Ingredients
1 boneless pork loin, 1 1/2 to 2 pounds 
2 slices bacon 
1/2 teaspoon chili powder 
1/4 teaspoon paprika 
1 teaspoons salt 
1/4 teaspoon coarse ground black pepper 
1/4 teaspoon ground cumin 
1/2 teaspoon ground cinnamon

Glaze:
1/2 cup light brown sugar, packed 
1 tablespoons flour 
1 tablespoons cider vinegar 
1/4 teaspoon dry mustard

Directions
Heat oven to 350° F. Place pork loin in a roasting pan or deep casserole dish lined with aluminum foil. Combine the rub ingredients in a small bowl and rub over the pork. Cut each strip of bacon in half and lay strips over the pork loin. Roast for about 40 minutes.

Combine the brown sugar, flour, cider vinegar, and dry mustard in a saucepan. Simmer for 1 minute. Spoon over the pork and return to the oven. Roast for about 15 minutes longer, or until pork registers 160°. Let sit for 2 minutes after removing from oven. Slice and serve.

Enjoy!


Salted Caramel & Vanilla Cheesecake


It was 'drool' at first sight for me and this recipe. As soon as I spied its glorious butterscotch-coloured center with its cloudlike topping and ooozy caramel dripping on the cover of the latest Donna Hay magazine I knew I had to make it. In fact I ended up making this a day early as I just couldn't wait another moment to dive into it with a side -turned spoon. A gigantic dessert side-turned spoon. 

I had two slices (well, slice is putting it lightly, more like slabs) straight after each other and had to practically bind my wrists not to have a third before dinner. After hearing my moans of gastronomic pleasure, my husband, who has never liked cheesecake, was so curious as to what could elicit such happiness from me asked to have a try. Alas, he still doesn't like cheesecake, although he did say it was the nicest cheesecake he didn't like...

If you like cheesecake then I have three words for you; GET. ON. IT.


Salted caramel and vanilla baked cheesecake 


 500g plain sweet shortbread biscuits
 ½ cup (60g) almond meal (ground almonds)
 150g butter, melted
 350g ricotta
 500g cream cheese
 1 cup (175g) brown sugar
 4 eggs
 2 tablespoons golden syrup
 ¼ teaspoon table salt
 2 teaspoons vanilla extract
 1 cup (250ml) single (pouring) cream
 1 cup (240g) sour cream
 1 tablespoon icing (confectioner’s) sugar, sifted
 sea salt flakes, for sprinkling
caramel sauce
 1 cup (250ml) single (pouring) cream
 60g butter, chopped
 1 cup (175g) brown sugar

To make the caramel sauce, place the cream, butter and sugar in a saucepan over low heat and stir until the sugar is dissolved. Increase heat to high, bring to the boil and cook for 5–7 minutes or until thickened. Set aside and allow to cool. Preheat oven to 160°C (325°F). Place the biscuits and almond meal in the bowl of a food processor and process until coarsely chopped. Add the butter and process to combine. Press the biscuit mixture into the base and sides of a lightly greased 22cm springform cake tin lined with non-stick baking paper. Refrigerate for 1 hour. Place the ricotta and cream cheese in the bowl of an electric mixer and beat for 5–6 minutes or until smooth. Add the sugar and beat for 3–4 minutes or until combined. Add the eggs one at a time, beating well after each addition. Add the golden syrup, table salt and 1 teaspoon of vanilla and beat until well combined. Spoon the mixture into the biscuit shell. Place the tin in a baking dish and pour in enough boiling water to come halfway up the sides of the tin. Bake for 1 hour 30 minutes or until firm to the touch. Remove cheesecake from the baking dish and allow to cool in the tin. Refrigerate for 3 hours or until set. Place the cream, sour cream, icing sugar and remaining vanilla in a bowl and whisk until soft peaks form. Top the cheesecake with the cream, drizzle with the caramel sauce and sprinkle with sea salt flakes to serve. Serves 8–10.

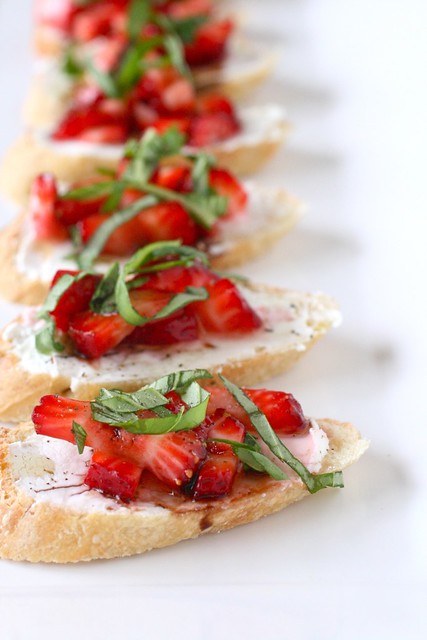
Strawberry Bruschetta


Strawberry Bruschetta

Ingredients:
1 cup strawberries, hulled and diced
1 tbsp. sugar
1 French baguette, sliced on a bias
4 oz. goat cheese
1 tbsp. olive oil
2 tsp. balsamic vinegar
¼ cup minced basil leaves
Freshly ground black pepper

Directions:
Combine the  strawberries and sugar in a small bowl; toss to combine.  Let the berries macerate for about 30 minutes so that they begin to release their juices.  Spread a thin layer of goat cheese on top of each baguette slice.  Top each slice with spoonfuls of the strawberry mixture.  Drizzle lightly with olive oil and balsamic vinegar.  Top each slice with the basil leaves and cracked pepper, to taste.


Grilled Pineapple Kebabs


Grilled Pineapple Kebabs


Directions:
1 fresh Pineapple
1/4 t. Honey
3 T. Butter, melted
1 dash Hot Pepper Sauce

Instructions:
Soak kebab sticks in water until they no longer float.  Cut off the top and bottom of the pineapple and hack lengthwise into eighths.  Trim off the middle core and outside prickly side from each eighth.

Mix honey, butter, hot pepper sauce, and salt and place pineapple into marinade.  Marinate for however long you think is appropriate.

Skewer pineapple eighths with kebab sticks and preheat grill pan.  Grill pineapple for 2 to 3 minutes per side, or until heated through and grill marks appear.

Adorable Banana Split Bites


When was the last time you had a banana split? It’s been a while since I’ve indulged in such a decadent dessert. So when I saw these tiny banana split bites on Bakers Royale, I knew I had to make them. More banana than anything, they’re fun little bites that are perfect for a party or just an afternoon surprise. And, they’re a great way to get your banana split fix in a tiny bite!

Scoop a hollow in the center


Add the ice cream

Dip in chocolate, add sprinkles

Garnish with whipped cream and a cherry


Banana Split Bites 
makes 12 bites

4 large, firm bananas
4 oz. semi sweet chocolate, rough chopped
1 cup vanilla ice cream (or your ice cream of choice)
1 cup heavy whipping cream
1 teaspoon sugar
cherries
multi-color sprinkles
cherry garnish

Cut bananas into 2 1/2” tall segments (roughly 3 per banana), trim the narrow ends, and leave the skin on. Quickly hollow out a 1/2” circle in the center of the banana. Add a tiny scoop of ice cream into each hole and put the bananas in the freezer to set for 30 minutes. Note that it’s best to leave the skins on until just before dipping in chocolate. I removed them before adding the ice cream and the bananas browned slightly.

Either in your microwave, or in a double boiler, heat the chocolate until it is melted and smooth. Whip the cream to soft peaks, add the sugar, and then whip to stiff peaks. Set out your sprinkles.

Remove the banana peel, dip the bottom of the banana in the melted chocolate and quickly coat with sprinkles. Set bananas back in the freezer for 5 minutes until the chocolate sets.

Top with whipped cream (I piped mine on using a plastic bag with a small hole in the corner) and a cherry. Serve immediately.


Strawberry Lemonade Layer Cake!!


INGREDIENTS:

One box of strawberry cake mix (plus oil, water and eggs as directed on box)
8oz. Philadelphia Cream Cheese (softened to room temp.)
1 packet (0.23oz.) of Kool-Aid Lemonade
Yellow food coloring gel (as desired for color)
2cups Jet-Puffed Marshmallow Creme
8 oz. Cool Whip Topping
Fresh strawberries to garnish.

DIRECTIONS:

Make cake according to box and bake in 2- 9 inch round cake pans as directed.  Turn finished cakes over on cake racks and allow to cool completely.
Cream together cream cheese, lemonade and yellow food coloring until smooth.
Mix marshmallow creme in and then mix in Cool Whip until completely smooth.  Refrigerate until cake is cooled and cut.
Cut each cake layer in half.
Alternating layers of cake with layers of filling, assemble cake.  End with layer of filling.
Top with sliced strawberries.
Refrigerate and serve chilled.


My thoughts: YUM!!!!!  I’m a little obsessed with the filling I used in those confetti cups a few weeks back.  This lemonade filling is similar- but has more Cool Whip to make it light and fluffy.  I’ve never made a strawberry cake mix before– it is SO GOOD!  I love that this recipe uses a cake mix- it makes it a VERY easy and quick recipe that looks so fancy and fun!  I think you could drizzle some white chocolate over this and make it over-the-top fancy.  I really hope you enjoy this recipe— I’ve gotta have a piece –ready….set….GO!


субота, 5. мај 2012.

Mini Oreo Cheescakes


MINI OREO CHEESECAKES


16 ounces cream cheese
2/3 cup sugar
1/8 tsp. salt
2 eggs
1 tsp. vanilla extract
1/2 tsp. lemon juice
1/2 cup sour cream
15.5 oz package regular size Oreo cookies (3 dozen cookies)
8 oz. package mini Oreo cookies (36 for garnish, 1 cup chopped to put in batter)

Preheat the oven to 300 degrees F.

Place one full size Oreo cookie in the bottom of every mini cheesecake cup. This will serve as the "crust" of the cookie. I find that using the entire Oreo cookie (as opposed to just half) makes it easier to remove the cheesecakes from the pan after baking.

Beat the cream cheese for several minutes until it is smooth and creamy.

Add the sugar and salt. Add eggs one at a time until incorporated.

Add the vanilla extract and lemon juice. Fold in the sour cream and chopped Oreo cookies and mix until combined.

Pour the mixture into the prepared cups (2/3 full) and bake for 25 minutes (the tops should spring back slightly when touched).

WHIPPING CREAM TOPPING
1.5 cups heavy whipping cream
1/4 tsp. unflavored gelatin
3 tsp. corn starch
3 tbsp. instant vanilla pudding mix

Combine all ingredients and beat for several minutes until the cream thickens and soft peaks form. Pipe onto tops of cheesecakes and garnish with a mini Oreo.

Yields 3 dozen mini cheesecakes.

Strawberry Watermelon Cooler


We are having a heat wave & it definitely feels like summer here in South Norwalk.  Yesterday, toward the end of the day we whipped up Strawberry Watermelon Coolers and they totally did the trick in helping us beat the heat.   This recipe (a Teroforma original) is quite simple and easy to throw together for a group, in our case 4.

Strawberry Watermelon Cooler (serves 4)
4 oz. Vodka
1 oz. Strawberry Liquor (any berry or pomegranate works)
juice of 1 lime plus slices for garnish
1 pound watermelon chunks
2 cups ice plus more for glasses
strawberries for garnish

Blend ingredients until frothy.  Pour over ice, garnish & sip until cool.


Mini Mexican Wedding Fruit Pizza


Cookie Base:
1 cup butter
1/2 cup powdered sugar
1 T vanilla
1 cup chopped pecans
2 1/2 cups flour

Preheat the oven to 350ºF.  Beat the butter and sugar together until light and fluffy.  Add the pecans and vanilla until fully incorporated.  Add in the flour and mix until just combined - don't overmix!  Spray each well with cooking spray (if using a silicone baking mold, this is unnecessary).  Using a small cookie scoop, drop one scoop into each well of the pan.  Press the dough down so it covers the bottom of each well evenly.  Bake for 10-12 minutes, until lightly golden.

Sweetened Cream Cheese:
1-8oz. cream cheese
1/2 cup powdered sugar
1 T vanilla

Mix all ingredients together in a stand mixer until light and fluffy.

Assembling:
sweetened cream cheese
cookie bases
2 peeled, sliced kiwis (halved)
6-8 sliced strawberries
blueberries (about 2 or 3 per cookie base)

Once the cookies are cool, spread with the sweetened cream cheese so it is fully coated.  Top each with a slice of strawberry, kiwi slice and a few blueberries.  Dust lightly with powdered sugar.

All components can be prepared a day ahead of time, but don't assemble all of the ingredients until at least a few hours before the party so they do not get soggy.  The cookie bases are able to be frozen weeks ahead of time in an airtight container; allow to thaw out in the fridge overnight the day before you need them.

Disclaimer:  While these have fruit on them, they are by NO MEANS healthy.  While they seem like a lighter option, and they do have some healthy fats and protein from the nuts (and the fruit helps, too), they are chock full of butter and sugar, so if you're looking for a healthy option, this is not it.  I've been seeing my post cropping up on fitness and health sites, and I don't want any of you to be mislead!  They're delicious either way, and I think they're worth the few extra calories.